Speaking with our Zapworks community we have found that access to 3D models can be a barrier when creating AR experiences. With this in mind, I have been exploring different apps you can use to create 3D models, using nothing more than the camera on a mobile phone.
The quality of cameras and processing power on phones has significantly increased. Meaning that now, you can now create 3D models from a series of photos in a matter of minutes. This process is sometimes referred to as photogrammetry. A complex name for using a series of images or videos to create a 3D model.
The definition of Photogrammetry is “Getting reliable information about physical object dimensions by examining and interpreting images. In the majority of cases, these images are regular pictures from a camera.”
There are a number of apps and services out there at a range of different price points. But don’t worry I am here to test them out, so you don’t have to. We put a series of apps to the test by creating 3D models of everyday objects around the house.
Read on to find out about which app is best for the 3D models you are creating.
Polycam
Price - Free trial, 5 free captures, added captures for completing certain actions
Pro Plan - $6.99 per month, or 12 months for $54.99
With Polycam you can create high-quality 3D models from photos with any iPhone or iPad, and rapidly generate scans of spaces with the LiDAR sensor. One main benefit of this app is you can edit your 3D captures directly on the device you used to create them. You can then export them in over a dozen file formats and also directly to Sketchfab.
With the trial or the free plan, you can export straight to GLTF, perfect for uploading into Zapworks Designer.
It took me a while to get to grips with the image capture to create 3D models with this tool. It was unclear which process would be best to capture my objects. I could either move the camera around the object or move the object around and keep the camera still.
The first few captures were super blurry as my camera had picked up the background along with the object, creating that into a 3D scene. After five attempts, I was finally able to create a decent 3D capture.
The support available was a little hidden, but once discovered I found the support documents to be good. The models exported were also slightly lower quality than the other tools tested.
Top Tips
- Use a clear and plain background so that Polycam does not include it within the model.
- Remember you can edit your capture, removing elements captured by mistake, especially the floor or the background.
- Take pictures from all angles to ensure you capture all of the object you are scanning.
Explore this 3D scan in AR

MetaScan
Free for individuals
Pro plan - $4.17 per month
App Store | Website
MetaScan offers the option to use a number of photos to create a 3D model of an object or using LiDAR to create a model of a space or a room. (LiDAR is a detection system which works on the principle of radar, but uses light from a laser.)
There are a number of export options available which means you can create and then export models to use within your chosen 3D tools. This is a great way to capture and showcase your products both within AR Web Embed and within world and image tracked experiences.
MetaScan also offers the ability to create a video of your 3D model, excellent for showcasing products or rooms on websites.
Firstly, I tried to capture a sign from my shed in 3D. The sign is a yellow hello sign mounted on the wall. I found it difficult to capture the back of the sign and also to eliminate the background of the wooden wall, however MetaScan picked up the sign and was able to separate it from the background.
The second time around, I selected a smaller object, a toy fire engine, and placed it closer to the camera. This ensured that MetaScan did not pick up any additional background.
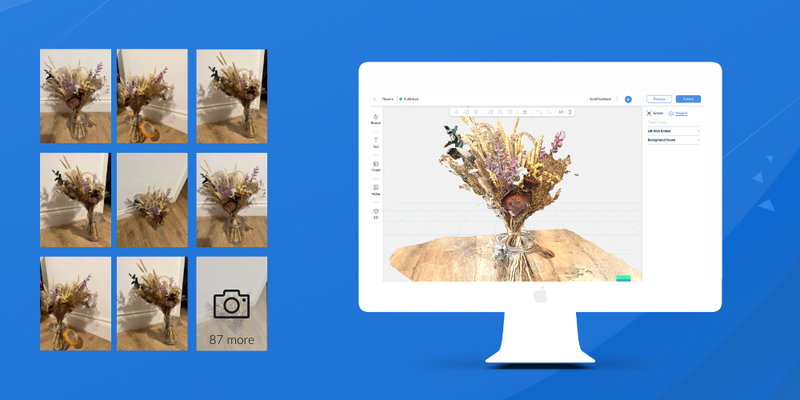
For the final capture, I chose a bunch of flowers. I wanted to test the capability of the app including capturing different textures, a more detailed object and also the challenge of a glass vase.
Explore the Flowers in an AR experience created with MetaScan.

Overall I found MetaScan to be a great tool for capturing the bunch of flowers as a 3D object, it was able to capture the different colours, textures and most of the glass vase with ease.
The only thing that I found more tricky was being able to take photos all the way around the object. This was just human error as the flowers were close to the wall so it was harder to take images of the back and the sides.
Overall I found the app easy to use with a clear user interface, the files created had a high quality and file size. It is a great choice for people starting to explore creating 3D models, VR and AR.
Top Tips
- Capture images close to the object you want to create as a 3D model.
- Adjacent shots should have 70% overlap or more for alignment.
- Take more images of reflective or transparent objects.
- Practice using the app, get familiar with how it works to capture the highest quality images.
KIRI Engine
Free Trial and a few 3D processes per week
Pro - $6.99 per month
App Store | Android Store | Website
KIRI Engine is a 3D scanning app based on photogrammetry technologies. KIRI Engine provides a full-power photogrammetry experience in a user-friendly way. It's very affordable, the app is free to download, and users have free 3D scans every week. For a small monthly fee, the app provides more powerful options to increase scan quality.
I found that the onboarding process was good, offering videos and guides on how best to capture images for a 3D model. They guided you through two options, either capturing automatically or manually. The automatic capture is similar to using a video, you would move around an object and images would be captured automatically. Manual allows you to choose what angles and images to capture and upload. However for the free version, you are limited to 70 photos for a trial.
Within the trial, you can create as many models as you want, but there are limitations as to how many models you can export. Three exported models per trial, then you have to pay for additional exports.
I found the capture experience to be quite easy, but I found the limit on image captures (70 for the trial) to be frustrating. It took quite a long time to process the images and create the 3D model and there was no timeline or information on how long the process would take.
When the process was completed, the 3D model had a lower quality than other 3D modelling apps. This is likely because of the limited number of photos you are able to capture on the free plan.
The main benefit of the Pro plans are that you can upload from external cameras, use desktop editor and you are able to export in more formats.
Top Tips
- Capture the object at all angles to ensure a good amount of coverage but be tactical about how many images you take!
- More detailed or bigger objects require more photos, so be tactical about what objects you choose to capture when on your trial.
- Use the app anytime except for 15:00 - 21:00 GMT as there is more “load” so processing time is longer.
Check out the 3D AR experience created from a scan of a camera.

Scandy
Price - Free
Pro - $5.99 per month
App Store | Website
Scandy was a really tricky app to get used to. It was most similar to “PinArt” as you could see each of the markers that were being captured as you moved. This was great to see how the model was building, as you moved the camera. However, Scandy was only able to capture small additional elements, most of the objects needed to be the same as the previous frame. This meant that you needed to move really slowly around the object and respond to the errors.
To create 3D models with this app you had to use the front facing camera as it has TrueDepth functionality. TrueDepth works by projecting thousands of invisible dots onto your face and analysing them to create a depth map of your face.
I was unable to capture a good model with this app. But with proper usage, Scandy should capture shape, size and depth of the object.
There are several options for how much detail you want to capture. This helps capture scans of small things such as rings or jewellery, or larger things such as furniture.
In terms of the user experience, it would be easiest to start using this app by creating a face scan. This is the easiest scan to perform due to the usage of the front camera. With a face scan you can see what you are capturing more easily than trying to capture an object on a table.
This app included a lot of noise within the object capture process and was extremely challenging to create a good scan of an object or even a face. I think this was due to the amount of information it was capturing within each frame and also because of using the front facing camera.
Top Tips
- When capturing a 3D model, ensure the background is plain and is a contrast to the object.
- Slowly move around your object so that Scandy can keep up to plot the full object.
- Start off with the low detail setting in Scandy, and select an object with minimal detail.
Final thoughts and key takeaways
Overall, I really enjoyed testing out the apps, I have learned a lot about how you can use photos to create 3D models. Which is a great alternative to sourcing them on Sketchfab.
A few of the things I learned were:
- Lighting - Make sure you have a well lit room to capture your model. However avoid strong lighting and also shadows, this will impact the quality of your capture.
- Background - It is really hard not to capture the walls or floor around your object. You may need to use additional tools to remove the background if you need a really clean capture. You can use Blender (Video or Guide) or there are a few other ways to clean up your scan here.
- Positioning of model - Place the model in a place which is easy to navigate around. You need to be able to capture as much as possible, ideally 360 degrees. Some apps allow you to move the model, but do practice with moving them around and understand how much you can move them. This is where I really struggled within PolyCam.
- Images - Capture as many images as possible for the scans, with more images the better the scan!
- Model size & detail - Pick models which are not huge so there isn't a vast amount to capture, but also not too small. Models with high amount of detail will require a higher number of images so take that into consideration when capturing your images.
I hope that this has inspired you to try one of these apps and create 3D models to incorporate into your AR experiences. We would love to see what you create and hear what tools you enjoy working with. Drop into our Forum to share what you have created and how you have added them into your AR experiences.
 Emma Moore
Customer Success Manager, Zappar