Augmented reality is often used as an immersive technology. This is where content developers aim to present users with a simulated experience that captures their attention and suspends their sense of disbelief that what they're seeing is real.
We've all felt the loss of that immersion before, such as in those movies where the computer generated characters just aren't quite right (I'm looking at you, JarJar).
Augmented reality has some unique challenges when it comes to immersion. Unlike computer games and virtual reality where each piece of 3D content must only remain consistent with a wider, simulated environment, AR content must look natural in the unpredictable real-world environment captured by the user's camera. And whereas movies and TV shows can spend hours generating each frame of footage, a real-time AR experience has only 16 milliseconds to render and composite the 3D content to the device screen.
In this post we'll discuss some of the techniques, best practices, and tricks(!) we can use to improve the photorealism of real-time AR experiences, and present a believable simulation to our users. We'll start with some super-simple content, and embark upon a journey of improvement 😃.
To catch this in video form, be sure to watch our webinar, approaching photorealistic AR for the web, on-demand.
Baseline
For the purposes of demonstration we'll be using the Three.js rendering engine for the web, and Zappar's Universal AR SDK for Three.js. That said, many of the techniques shown here have corresponding implementations in the other rendering engines supported by Universal AR, and indeed in an imminent update to our Zapworks Studio tool.
Our baseline is a simple world-tracked experience. Our Universal AR bootstrap project includes a cube tracked to an anchor-point chosen by the user.
let box = new THREE.Mesh(

    new THREE.BoxBufferGeometry(),

    new THREE.MeshBasicMaterial()

);
Immediately we can identify some issues with immersion - the cube looks pasted onto the screen rather than part of the world in front of the user.
Lighting
We can see objects in the real world because light from a source (e.g. the sun, or a lamp) bounces off surfaces into our eyes. The physics of this process determines what the object looks like, such as its color, brightness, reflection etc. Our brains are very good at using the light that reaches our eyes to work out what objects are made of, and exactly where they are in our environment. That's one reason why our cube looks so out-of-place - we haven't simulated any light physics.
Thankfully, 3D rendering engines provide a number of different mathematical approximations (models) to the real physics behind light. Each model has its own trade-off between accuracy and performance. We're going to choose one that's based on Physically Based Rendering (aka PBR) principles and models surfaces as being either metallic or non-metallic, having a degree of roughness, plus a few other parameters.
We can update our cube experience in Three.js like this:
let box = new THREE.Mesh(

    new THREE.BoxBufferGeometry(),

    new THREE.MeshStandardMaterial() // <- the Three.js metallic-roughness material

);
We also need to add a light source to our scene. Since we don't know what actual light sources exist in the user's room we'll have to guess and add a single directional light coming from above (perhaps it's the sun, or the main light in a room).
let light = new THREE.DirectionalLight();

light.position.set(0, 5, 0); // Position above the tracking anchor

trackerGroup.add(light);

tracketGroup.add(light.target); // Point the light at the center of the tracking anchor
This is looking a bit better; but things aren't quite right yet. The sides of the cube are completely dark since the only light in the scene comes from our single directional light directly above. A real world cube would be lit from the sides by indirect light bouncing off nearby surfaces.
Before we fix up our lighting, let's swap out our cube for something more interesting.
3D Models
Using high quality 3D assets is essential to building immersive experiences. In particular consider the following when choosing or building 3D models:
- make sure the 3D assets match the lighting model you're using (e.g. PBR),
- use a 3D model format that's well supported by your rendering engine (for most modern engines glTF is a fantastic choice that has great PBR support),
- models with too few polygons may look blocky or unrealistic.
Note that high quality 3D models don't necessarily have to have high resolution textures or huge numbers of polygons. Masterful 3D modelling can often produce great assets that are also memory and computationally efficient.
If you're lucky enough to work with a team of talented 3D artists (as we are at Zappar) then develop together a style guide and workflow. Otherwise there are fantastic model repositories online, such as SketchFab.
Let's switch out our cube with this helmet model.
The model's great but we can see there's still work to do on our lighting.
Lighting #2: Environment Maps
Our 3D renderer is doing a great job of reflecting the light from our directional light source. As we have seen, real world objects also re-reflect light that's already been reflected by nearby objects. Mirrors and other shiny objects are obvious examples, but almost all objects do this to some degree. Since our helmet model is particularly shiny, it appears really dark on screen without any indirect lighting.
With PBR, we can model indirect light using an environment map. It's a panorama image that tells the renderer what the area around a given point in 3D space looks like. Game engines with predetermined levels will often generate these when the game is compiled and distribute them along with the 3D assets. Since we don't know what the user's environment looks like ahead of time, we'll have to find a different solution for AR.
Thankfully, Zappar's library provides a tool for automatically generating an environment map from the camera feed from the user's device. The technique is a 'trick' - there's no way to know for sure what the user's environment exactly looks like since we can only work with the narrow field of view that we receive from the camera. That said it does a great job of improving the perceived realism of the experience.
It's added to our Three.js scene like this:
let envMap = new ZapparThree.CameraEnvironmentMap();

scene.environment = envMap.environmentMap;
Then we update it every frame so the map keeps up-to-date with the latest camera data:
function render() {

                // ...

    envMap.update(renderer, camera);

                // ...

}
Our model is beginning to feel much more integrated into our real world environment.
Gamma Correction
The process that gets pixels from a computer's memory into your brain through your eyes is somewhat complex.
There's a particular complication caused by how we perceive the intensity of the light that we see. In general, if we have two objects side-by-side, and the first is lit such that double the amount of light reaches our eyes from it than from the second, that first object appears to us more than twice as bright than the other. This is because our visual perception of intensity is non-linear.
On the other hand when our rendering engine computes the lighting for our scene it needs to do so in a linear fashion. This is because it's not the physics of light that's non-linear, just our perception of light.
If this all sounds very confusing - don't worry, it is 😅! Thankfully our cameras, phone screens and 3D rendering engines have done most of the hard work for us. In order to match our perception of light, most image files store data as a non-linear format called sRGB, and most monitors and phone screens display sRGB. So in order to make sure everything appears on screen correctly, there are two steps we need to take:
1. Tell the rendering engine that our input textures are stored in sRGB. That means the engine will correctly convert them to linear before doing the lighting calculations. Three.js' GLTFLoader automatically does this for the textures it loads. For the background camera texture we can do this: camera.backgroundTexture.encoding = THREE.sRGBEncoding;
2. Ask the rendering engine to convert the final lighting results to sRGB for display on the screen. With Three.js we do this: renderer.outputEncoding = THREE.sRGBEncoding;
With those two magic lines of code in place our 3D model looks as the artist intended.
Real-time Shadows
There's one final technique that we can use that helps to trick our brains into believing our AR objects are real. Almost all opaque objects (with the exception of vampires) cast shadows, yet in our current work-in-progress demo, the helmet does not.
Three.js has real-time shadow functionality, we just need to configure it. First step is to enable it on our renderer:
renderer.shadowMap.type = THREE.PCFSoftShadowMap;

renderer.shadowMap.enabled = true;
Next we ask our directional light to cast shadows:
light.castShadow = true;
Then we ask our 3D assets to both cast and receive shadows. Using GLTFLoader we do this:
gltf.scene.traverse(node => {

    if (node instanceof THREE.Mesh) {

        node.castShadow = true;

        node.receiveShadow = true;

    }

});
And finally we need a transparent 3D object beneath the helmet to act as the 'ground' and display the shadow.
let shadowPlane = new THREE.Mesh(

    new THREE.PlaneBufferGeometry(),

    new THREE.ShadowMaterial()

);

shadowPlane.rotateX(-1 * Math.PI / 2); // Rotate the plane to be flat on the ground

shadowPlane.material.opacity = 0.3; // Make the plane semi-transparent so some of the ground is visible under the shadow

shadowPlane.receiveShadow = true;

trackerGroup.add(shadowPlane);
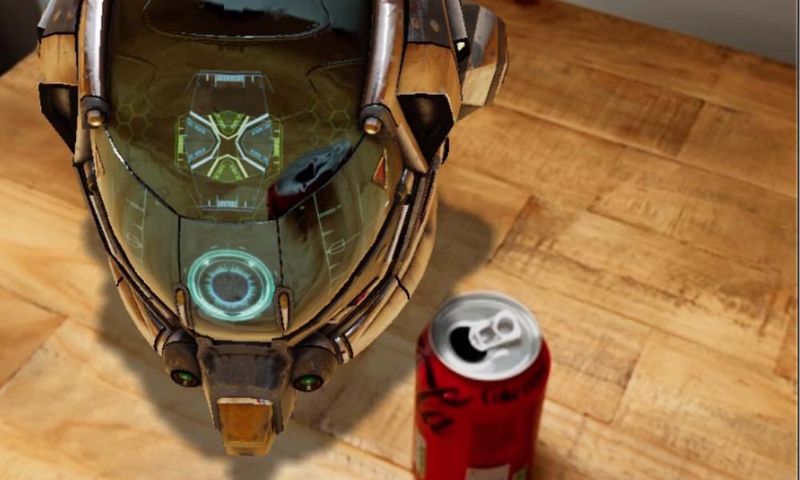
We can now see our 3D model cast a realistic shadow.
Summary
With these techniques in place we've drastically improved the photorealism of our AR experience, and thus our users' immersion. They offer a great balance of realism versus performance, and they're all possible on the web today thanks to some fantastic rendering engines, and of course Universal AR.
We'd love to hear if you've found any great tips or tricks for improving the photorealism of your AR scenes - let us know over on the forum, or get in touch directly!
 Connell Gauld
Co-founder and CTO, Zappar